Blog
How to Replace Ford F150 Existing Rear View Mirror with Our Replacement Mirror Monitor
Your first step before beginning the installation is to check and make sure that your new package is complete. It should contain:
1. 4.3-inch replacement mirror monitor.
2. all required accessories and mounting bracket.
Replacement Rear View Monitor Installation Guide
Step 1. Run the camera cable. Make sure that the camera cable is properly routed from the back of the vehicle to the front first. The best path to run the cable through will always depend on the make of your vehicle. For some cars, you might need to pass the camera cable underneath, while others may present interior cabling routes. For a rear-view monitor, it’s best to pass the cable through the left or right windshield pillar, but again, your vehicle type will determine how easy this would be.
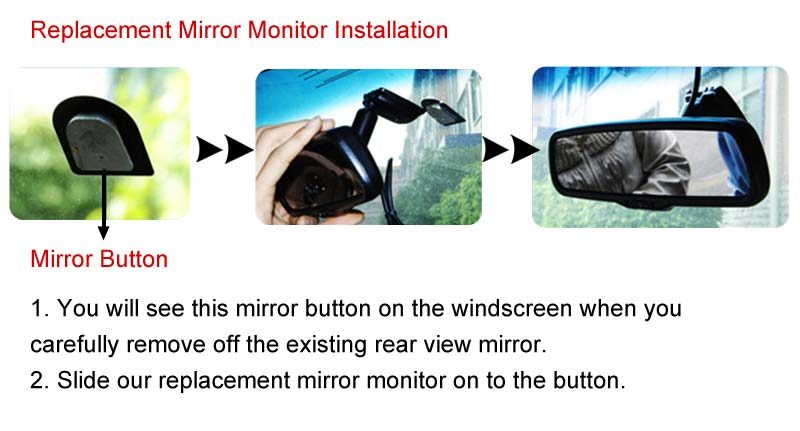
Step 2. Remove old rear-view mirror. This replacement rear-view mirror monitor is designed to replace a button mounted rear-view mirror on your car’s windshield. You only need to slide the mirror up and it will come off, leaving the button still on the windshield. If you have a different kind of rear-view mirror setup, then you’ll have to get the button mount kit and install it on your windshield first. They are pretty easy to install, you just need to follow the manufacturer’s instructions and allow some time for the adhesive to cure.
Step 3. Slide in the replacement mirror. Following the same way you slid off the old rear-view mirror, simply slide in the replacement rear-view monitor. If you had to attach a new button to your windshield using a DIY kit, then it’s advisable to wait a few minutes before installing the new mirror. This allows enough time for the adhesive to properly cure and hold well.
Step 4. Connect the system. Now is the time to connect the monitor with the rest of the system. There are 2 RCA video connectors for supporting up to 2 cameras. The black wire is ground, which goes to the vehicle’s chassis, while the Red cable connects to a 12 Volt power source for power, and the Green wire connects to the vehicle’s back up light to provide a trigger signal to switch on the monitor.
You can either connect the Red and Green wires to the backup light together, in which case the monitor will power up when you shift into reverse, or you can connect them separately. With the Red wire connected to a constant power source and not the backup light, the monitor will power on once you start the car, but it will only display an image once you get into reverse gear and your back up light triggers the Green wire.
Step 5. Test. After connecting all the wires correctly, this last testing step requires you to start the car and shift into reverse. If all went well, you should get a nice crispy backup image on your new rear-view mirror monitor.