Blog
How to Replace Your Ford F150 Existing Tailgate Handle with Our OEM Backup Camera
In this guide, you will learn how to replace Ford F150 existing tailgate handle with our OEM backup camera. Your first step is to check that you have everything necessary for the installation.
Prerequisites:
1.The Package. Make sure it is intact and everything is there.
2. Torx T30 Driver or Bit. You’ll need this to open the tailgate cover.
3. 11mm wrench with extension. The extension is important because of the depth of the nuts.
4. A drill, possibly. You can choose to drill holes or not.
Following are the steps you need to follow to successfully how to replace Ford F150 existing tailgate handle with our OEM backup camera.
Step 1. Open the Tailgate. Your first step is to open the tailgate of your truck and let it lie completely flat. That is, it should be at the same level with the rest of the truck bed.
Step 2. Unscrew the tailgate shield. There are 6 Torx T30 screws holding the tailgate’s shield in place. You’ll have to unscrew them all and keep the screws in a safe place. Once the screws are out, you’ll also need to pull up the side of the shield, closest to your truck bed, because it has extra pins there.
Step 3. Open the shield. Once the screws are out and you’ve pulled up the two pins, gently remove the shield and keep it somewhere safe. What you will now have before you is the bare tailgate.
Step 4. Unscrew the 11mm nuts. You will now be able to see the backside of the tailgate handle. This is the time to make sure that the extension for your 11mm is long enough. Look well at both sides of the handle and you should see 2 11mm nuts. Unscrew them gently, and your old tailgate handle will fall to the floor.
Step 5. Switch in the our new tailgate handle with backup camera. Looking at your old handle, you will see a clip which is holding the lock to the handle, pull it out and the lock will be free. Now attach the lock to your new tailgate handle and install it into your tailgate.
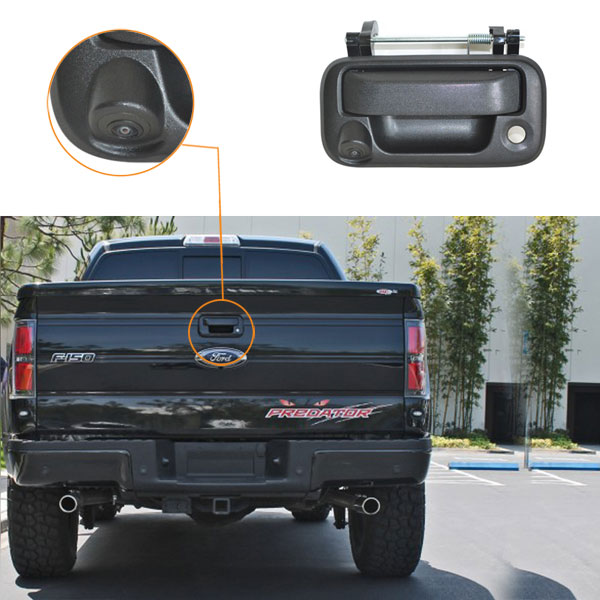
Step 6. Fix with nuts. Now comes the time to tighten the new handle using the 11mm nuts. Also, make sure that it gets hooked in properly and that it works well when opening the tailgate.
Step 7. Run your cable. If you want your cable installation to go easily, then make sure you removed the entire tailgate shield. Run your cable from the tailgate handle down to the base of the tailgate, where there is a hole. After passing the cable through this hole, attach your power and trigger wires to your truck’s reverse light. You will need the wrench to unscrew the lights for this.
Step 8. Reach a decision. You can either run the cable underneath the truck bed’s protective shield and by its sides all the way to the cabin, or you can run the cable underneath the truck to the cabin. If you go through the truck bed, then you will need to drill a hole into the cabin. If you go underneath, then you will find holes that lead into the truck’s hood first and then into the cabin.
Step 8. Cover the tailgate. Cover the tailgate with its shield once you have finished.
Step 9. Finish up installation. This includes connecting the cable to the monitor and making sure everything is okay.